Organisation
Overview
The Organization Profile is the main page with your organization details. Here you can view and edit the details. This details are also used by 1GLOBAL to know your company better.
To access this page, click on Organization in the side bar and then Profile.
The Profile page is split in two panels, the first has your organization details with the following fields:
Name: name of your organization.
Segment: segment information associated with your organization (Unknown, Micro Enterprises, Small and Medium Enterprises, Corporate/Large Enterprises, Public Administration, Wholesale and Partner Operator).
Vertical: vertical information associated with your organization (Agriculture, Automotive, Building, Healthcare, Utilities, Industrial, Public Infrastructure, Retail/Consumer and Security).
Description: small description of your organization.
Date Added: date when your organization was provisioned in the Platform.
Language: notifications language, by default is English. The second panel has your organization contacts with the following fields:
Email address: email of the organization.
Phone Number: organization contact fixed phone number.
Fax Number: organization contact fax phone number.
Website: organization web-site URL.
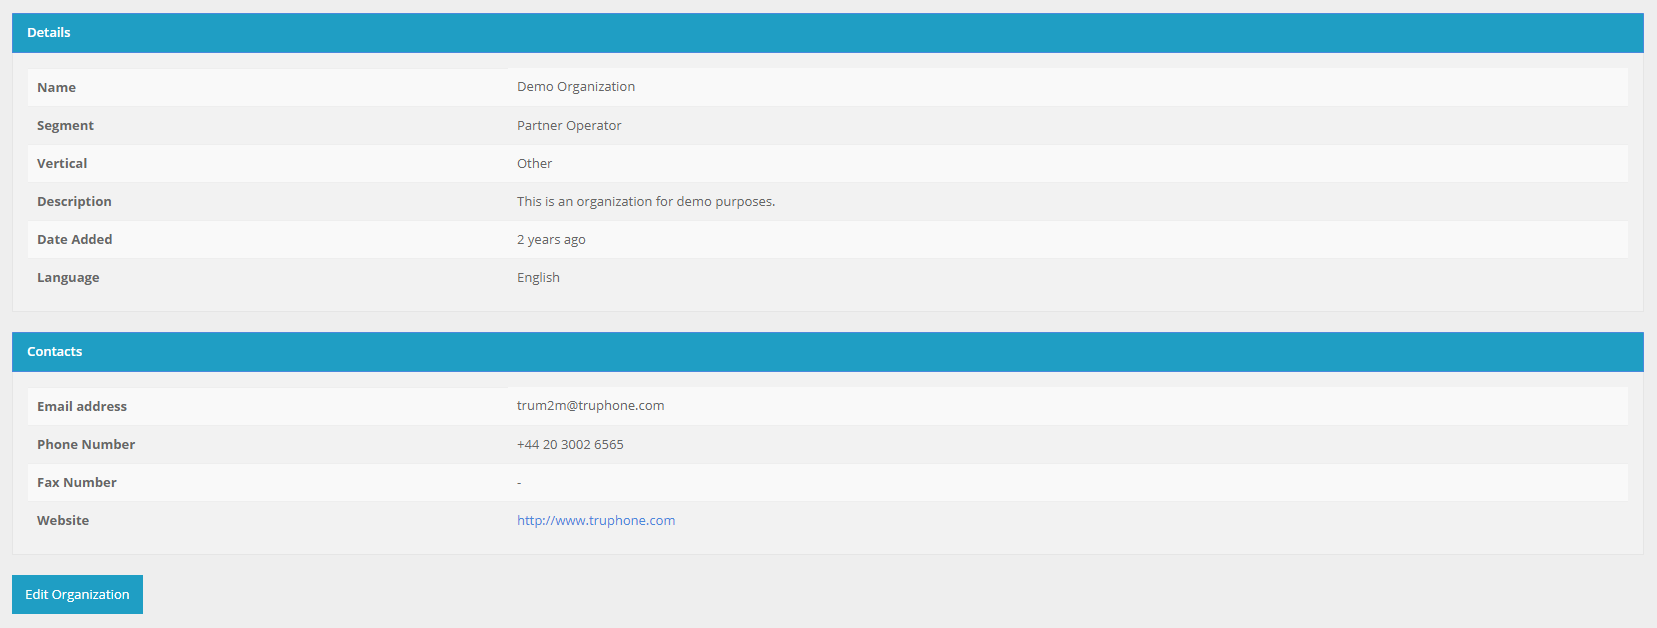
Organization profile panels.
Edit
You can edit the fields associated with your organization. To edit, click on Organization located at the side bar, go to the Profile section and click on the Edit Organization button at the end of the page.
Sub Organizations
Sub Organizations are organizations that are “owned” by your organization.
1GLOBAL’s M2M Platform allows Admin users to create Sub Organizations with their own user account. You can move SIM Card(s) that you own in your main account to your Sub Organizations. This is a great way to segment the SIM Cards in your Organization with your resellers or your departments and let them manage their connectivity.
Your Sub Organizations do not have permission to create their own Sub Organizations, the remaining features are allowed.
To access the Sub Organization page, please click on Organization in the side bar and then click on the Sub Organization section.
List
When you access the Sub Organizations section, you will see a table with the current Sub Organizations created or a message saying that you do not have Sub Organizations in your account.
The table has the following columns displayed:
- Name
- Total SIM Cards (Total SIM Card(s) in the Sub Organization)
- Actions (Edit, Manage SIM Cards, Manage Top Ups and Delete) note
The Manage Top Ups action is only available if the main organization follows a prepaid business model with plan topups

Table with Sub Organizations.
All fields, except for Actions, can be filtered and ordered, you can also show or hide unnecessary columns. To access the Sub Organization details you need to click on the name field.
At the end of the page you will have a button to create new Sub Organizations.
Create
To create a new Sub Organization, you need to access the Sub Organization section and click on the Create Sub Organization button. The button is located bellow the table with your Sub Organizations.
The form to create a new Sub Organization is split in two parts, the User Account where you fill the Admin user information and the Sub Organization Details.
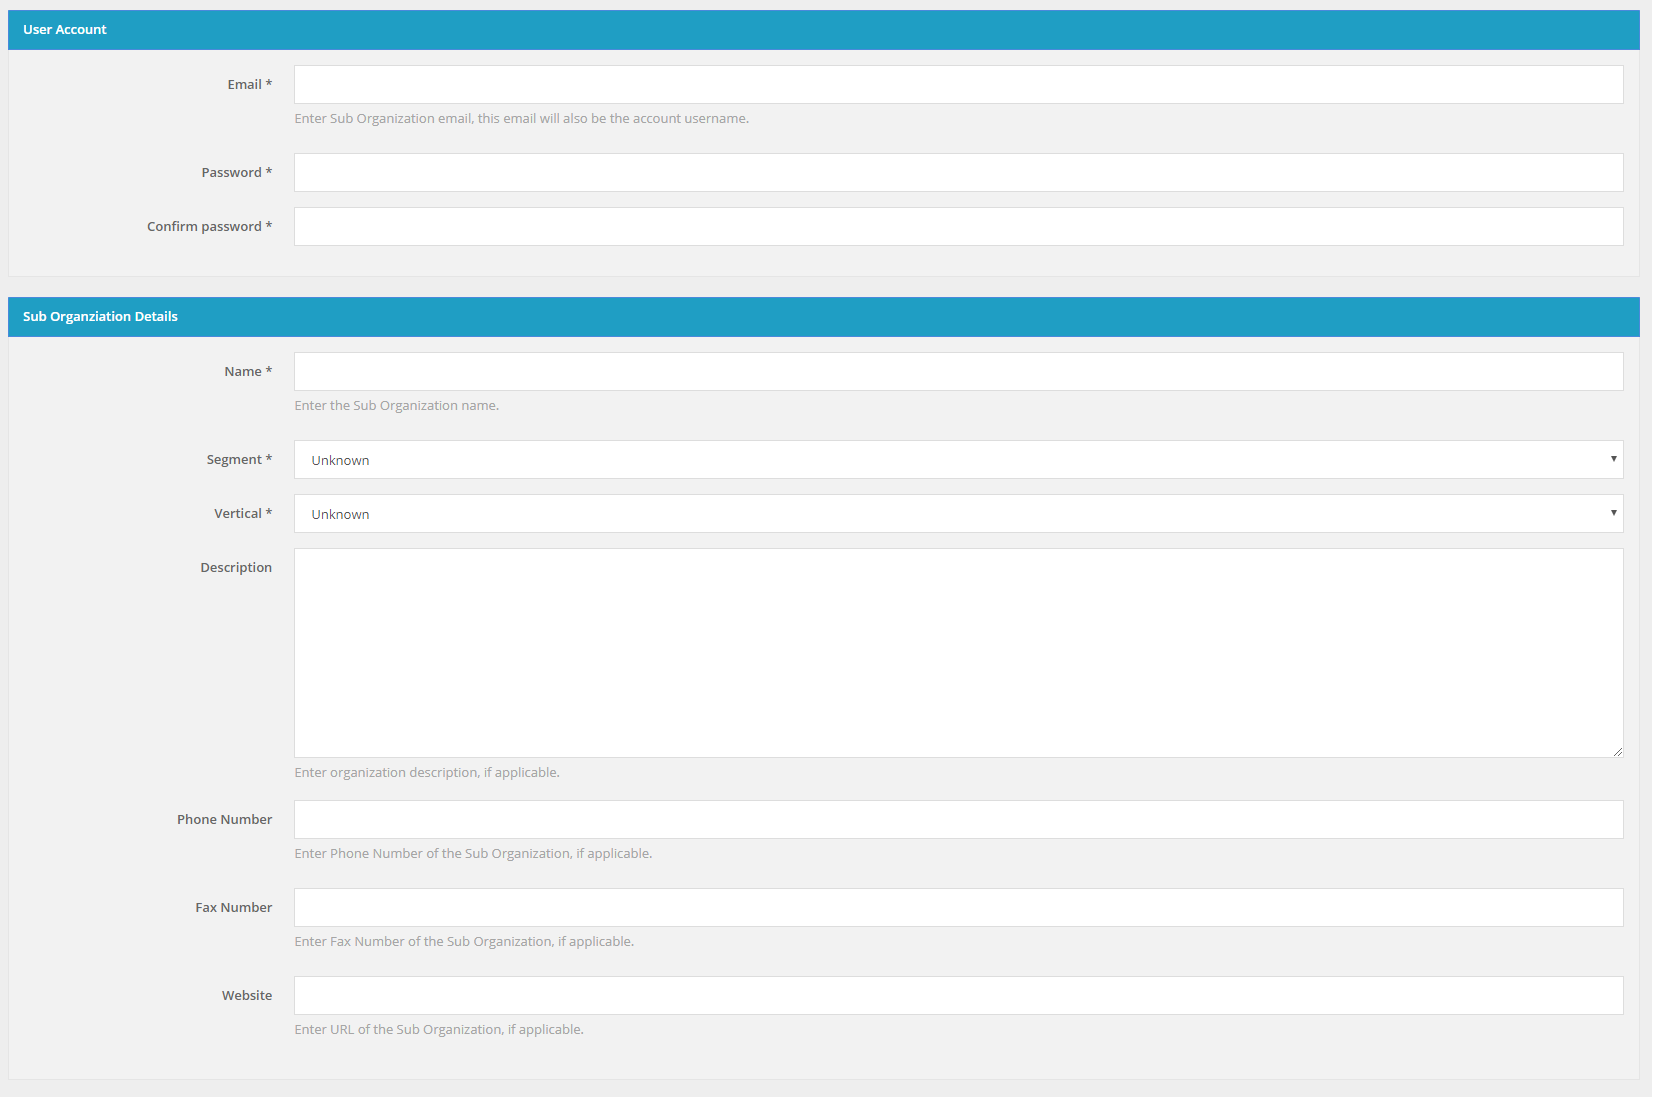 Form to create a new Sub Organizations.
The Admin user will need an email address and a valid password. For the Sub Organization Details only the name, segment and vertical fields are mandatory. The Sub Organization details can be edited later by you or by the Sub Organization Admin user.
Details
To access to a specific Sub Organization details you need click on its name in the Sub Organizations table.
The details page has four panels: Details, Contacts, Users and Other Information.
At the end of the page you have the Edit and Delete buttons.

Detail page for a Sub Organization.
Details
The Details panel shows the information for the select Sub Organization (Name, Segment, Vertical, Description and Date Added).
Contacts
The Contacts panel shows the contacts for the select Sub Organization (Email address, Phone Number, Fax Number and URL).
Users
Shows the users in the selected Sub Organization. The information is displayed in a table with the Name, Email and Role for each user.
The same Sub Organization can be manage by several users, with different roles:
- Admin – access to all account features
- Technical – limited to function related to support or development (e.g., SIM cards, device, rules and API)
- Customer - limited access to details
For more information on roles please check the roles section.
Other Information
This panel shows additional information related to the Sub Organization.
Total SIM Cards Here you can see the total of SIM Cards the selected Sub Organization can manage. If you click on the Manage SIM Cards button, you can move SIM Cards from your Organization to your Sub Organization and vice versa.
Edit
To edit a specific Sub Organization you can click on the Edit button in the Sub Organizations table or the button located at the end of the Sub Organization Details page.
You can edit the following Sub Organizations fields: Name, Segment, Vertical, Description, Phone Number, Faz Number and Website.
Delete
To delete a specific Sub Organization you can click on the Delete button in the Sub Organizations table or the button located in the Sub Organization Details page.
Be careful with this operation, you cannot revert it. The SIM Cards in that Sub Organization will move to your organization.
Manage SIM Cards
To move SIM Cards to a specific Sub Organization you can click on the Manage SIM Cards button in the Sub Organizations table or the button located in the Sub Organization Details page.
This page will show two windows. The left window has the SIM Cards that you can currently manage in your organization and the right has the SIM Cards that the selected Sub Organization can manage. You can move SIM Cards from one window to another and when you are satisfied click on the Save button to move the SIM Cards.

Form to move SIM Cards.
All additional information added to the SIM Cards (e.g. Attributes, Tags) will be deleted and the Notifications are moved to Sub Organization. In case you have Rules (Event or Usage) with the moved SIM Card has a filter, this will also be removed.
Manage Topups
Organizations with a prepaid business model and with the ability to automatically topup SIMs can limit the number of automatic topups for all SIMs from sub-organizations which allows to control costs automatically. Each sub-organization can have a limit on the number of top-ups per rateplan otherwise it will be unlimited.
Organizations with this feature enabled, the following menu function will be available:
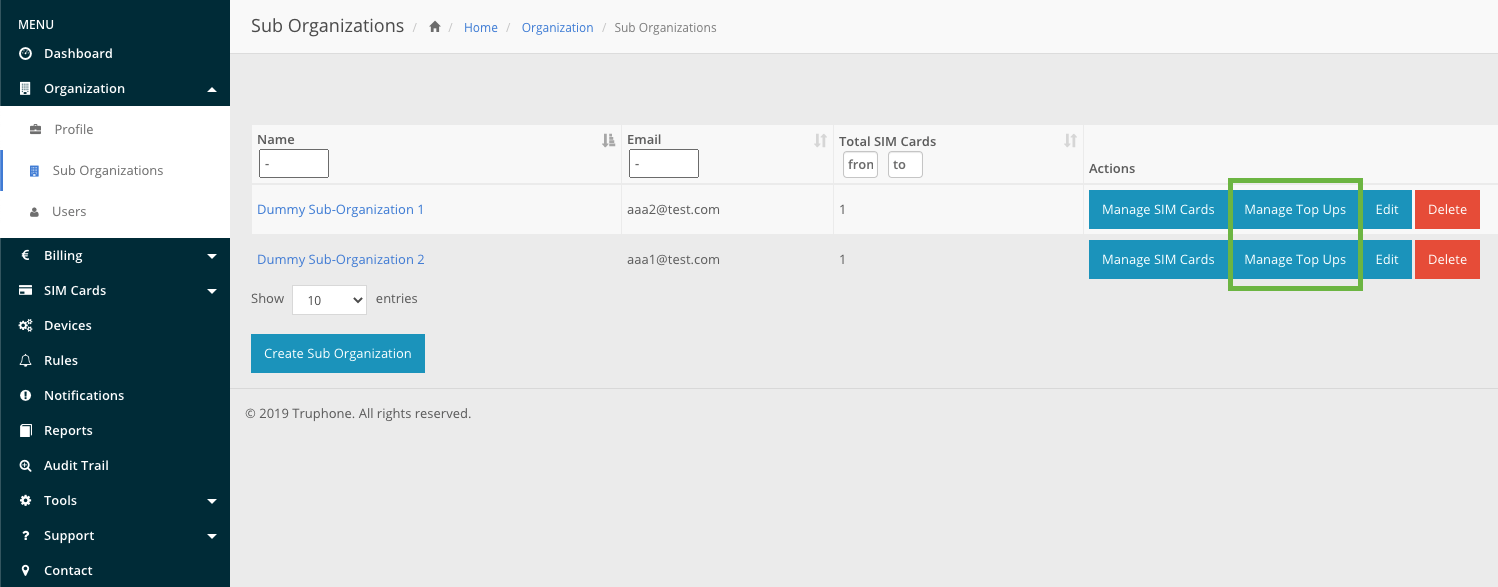 Manage top up action in Sub organizations menu
The manage topups menu allow main organization users to set topup limits for rateplans in each sub-organization. The limit per rateplan can be defined with one of the following options:
- 0 - No topups are allowed
- (none) - If no limit is defined, topups are unlimited
- Unsigned integer value - numeric value that represents the limit of topups
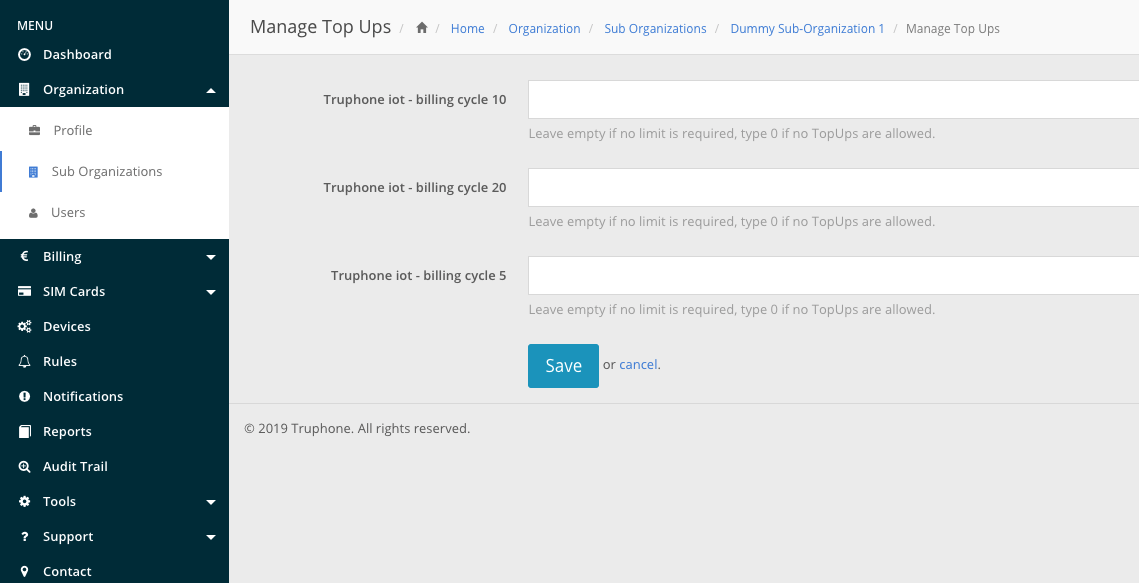 Set limit per rateplan menu
The defined limit takes into account all previous topups so when increasing this limit the number of topups that already happened at that time must be considered. As an example, if the current limit for a given rateplan is 10 and one wants to increase to 20 then the limit should now be defined as 30.
These organizations can also check their existing top up limits in the sub-organization details page:
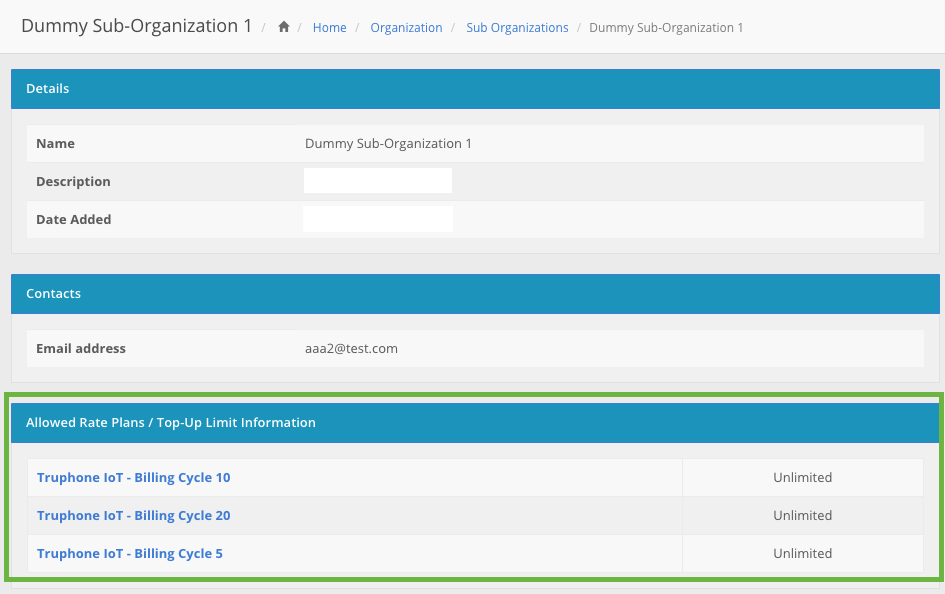 Sub-organization details page
When the number of automatic topup reaches the defined limit the SIM card is automatically suspended and the rateplan is unassigned.
More information on how to create Automatic Top-Up Rules on this section.
Users
1GLOBAL’s M2M Platform allows Admin users to create other users that will have access to their organization account. The users created can have the same role and permissions has the Admin user or have a more restricted role. This is a great way to give access to the platform and your organization SIM cards to other people within your company.
Roles
Each user has a role that grants access to a particular set of information and features. Depending on the type of account (Postpaid or Partner)
Admin (Postpaid accounts only)
- API
- Audit Trail
- Devices
- Docs
- FTP
- Notifications
- Reports
- Rules
- SIM Cards
- Sub-Organizations
- Can access Users
- Can edit Users (Customer, Tech, Admin)
- Can create Users (Customer, Tech, Admin)
- Can delete Users (Customer, Tech, Admin)
- Can edit organization
Technical (Postpaid accounts only)
- API
- Audit Trail
- Devices
- Docs
- FTP
- Notifications
- Reports
- Rules
- SIM Cards
- Sub-Organizations
- Can access Users
- Can edit Users (Customer, Tech)
- Can create Users (Customer, Tech)
- Can delete Users (Customer, Tech)
Customer (Postpaid accounts only)
- Audit Trail
- Docs
- FTP
- Notifications
- SIM Cards
Partner (Partner accounts only)
- API
- Audit Trail
- Devices
- Docs
- FTP
- Notifications
- Reports
- Rules
- SIM Cards
- Sub-Organizations
- Can access Users
- Can edit organization
- Can access Activation Portal
API Permissions
If a certain role has permissions to use "API" and another feature, then that role can do use that feature through API (if there is an API to do so).
List
To access the Users list, click on the Organization section in the side bar and then click on the Users section.
The displayed table will always show at least your Admin user. The following columns are visible:
- Username/Email
- Name (First and Last name)
- Role (e.g. Admin, Tech)
- Actions (e.g. Delete)
 Table with Users.
All columns, except for Actions, can be filtered and ordered, you can also show or hide unnecessary columns. To edit a specific user you need to click on its username/Email.
At the end of the table page, you will have the Add a new User button.
Add
To create a new user, you need to access the Users section and click on the Add a new User button. The button is located bellow the table with your current users.
The form to create new users will ask for an Email address, password and role, this fields can be edited later by you or by the user.
Form to create a new user.
Delete
To delete a specific user you can click on the Delete button in Actions column of the Users table.
Be careful with this operation, you cannot revert it.